A battle drill is a collective action a squad or platoon executes without a deliberate decision-making process. It is initiated by a cue — a burst of fire, a shouted word — and it runs on rehearsal, not on orders. That definition is the whole reason the drill exists: in the first seconds of contact nobody has the information to decide anything, so the element does the thing that is always right and buys its leader the time to find out.
React to contact is the foundational one. It is Battle Drill 2 in the older US numbering and it survives, essentially unchanged, in current infantry doctrine. Everything else — squad attack, break contact, react to ambush — starts from it.
Six frames. Watch where the reflex ends and the judgement starts.
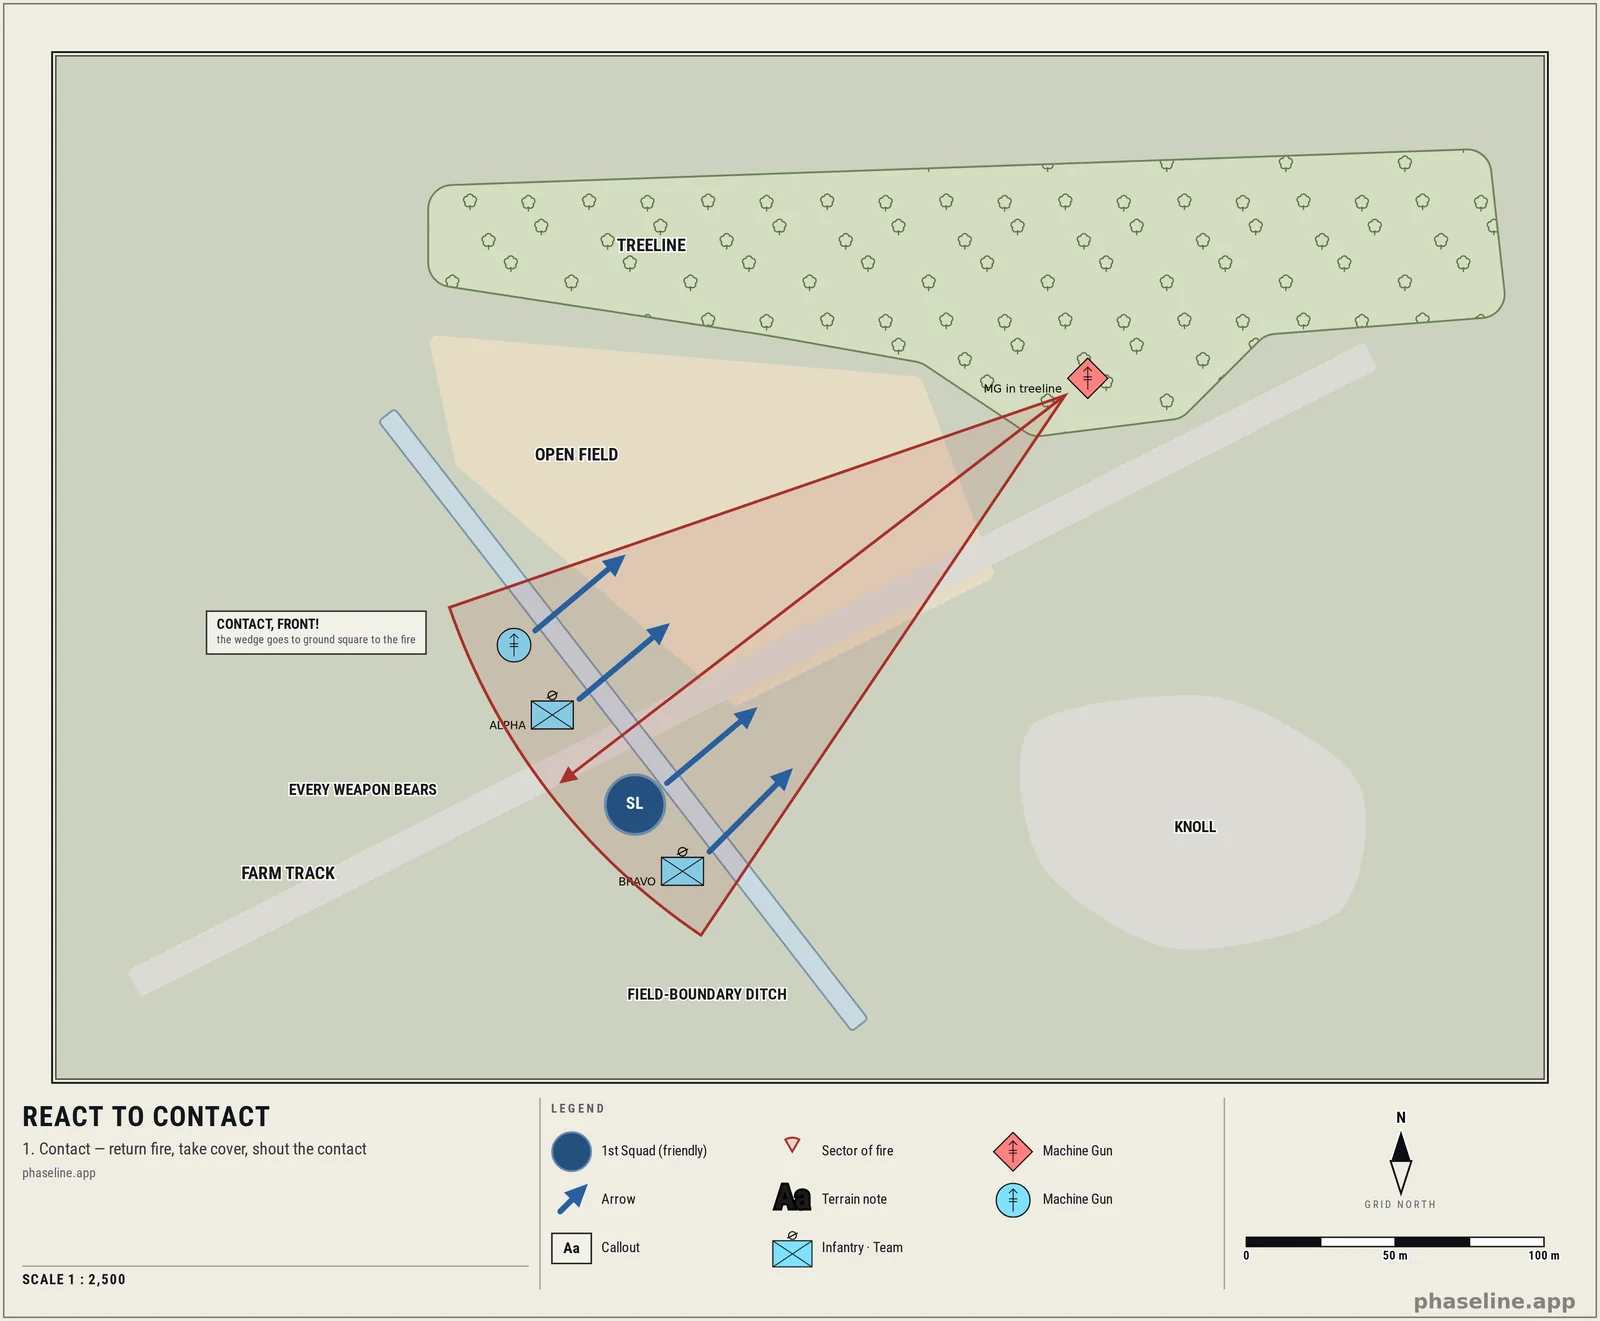
The situation. 1st Squad is moving north-east along a farm track in a wedge, teams Alpha and Bravo. A field-boundary ditch cuts across the line of advance; beyond it, open ground runs up to a treeline two hundred metres to the north-east, and in that treeline, at a bend that looks across the whole approach, an enemy position with a machine gun. A low knoll sits off to the south-east.
1. Contact
The gun opens up. Nobody has ordered anything, and nobody will for several seconds.
Three things happen at once, and all three are trained rather than commanded: the soldiers in contact return fire immediately in the direction of the enemy, take the nearest covered position, and shout the contact — "CONTACT, FRONT!" Return fire comes first. An element that goes to ground silently has conceded the initiative and will not get it back cheaply.
Note what is not happening. Nobody is identifying the enemy position, counting them, or deciding anything. The squad leader is on the ground with everyone else. The drill's first job is to stop the squad being killed while it works out what is going on.
Note also what does not happen to the formation: nobody re-forms. The wedge goes to ground as it stands, square to the fire, and that is the entire reason the squad was in a wedge — it becomes a line of weapons facing the threat with no repositioning at all. The failure to avoid is stringing out along cover that runs toward the gun. A squad in file down a ditch that points at the enemy has one weapon in the fight and its whole length in the beaten zone. Cover is only cover if it lies across the fire.
2. The report
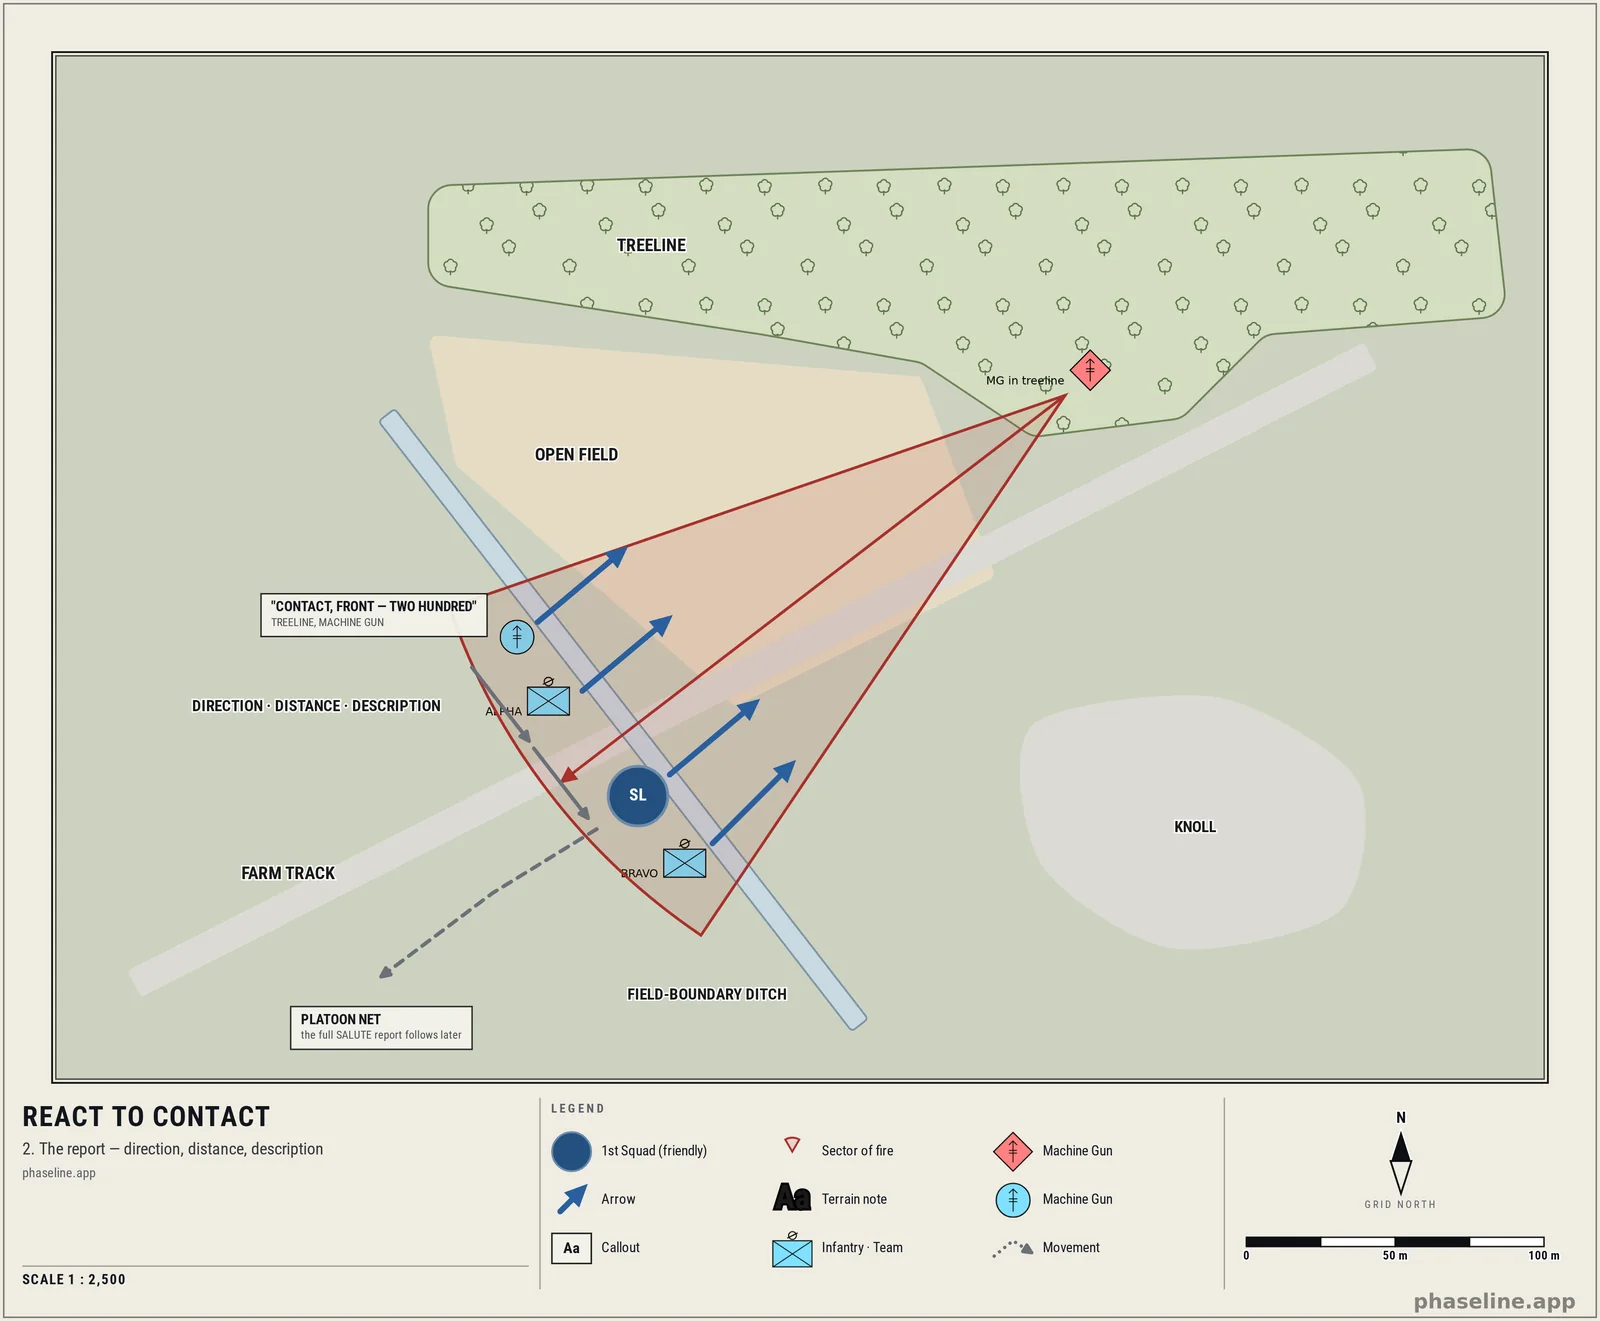
The contact call travels: soldier to team leader, team leader to squad leader, squad leader to platoon. It is short, and its shape is fixed — direction, distance, description.
"CONTACT, FRONT — TWO HUNDRED — TREELINE, MACHINE GUN."
Three pieces of information, deliverable while prone under fire, and enough for the platoon leader to start moving assets before anyone has a proper picture. The fuller SALUTE report — size, activity, location, unit, time, equipment — comes later, once somebody has actually looked. Do not wait for the good report before sending the fast one.
This is the same principle as a drawn control measure: a fixed format everyone reads identically, so coordination survives the fact that nobody has time to explain themselves.
3. Fire superiority
Now the squad has to win the firefight, because nothing else in the drill is available until it does.
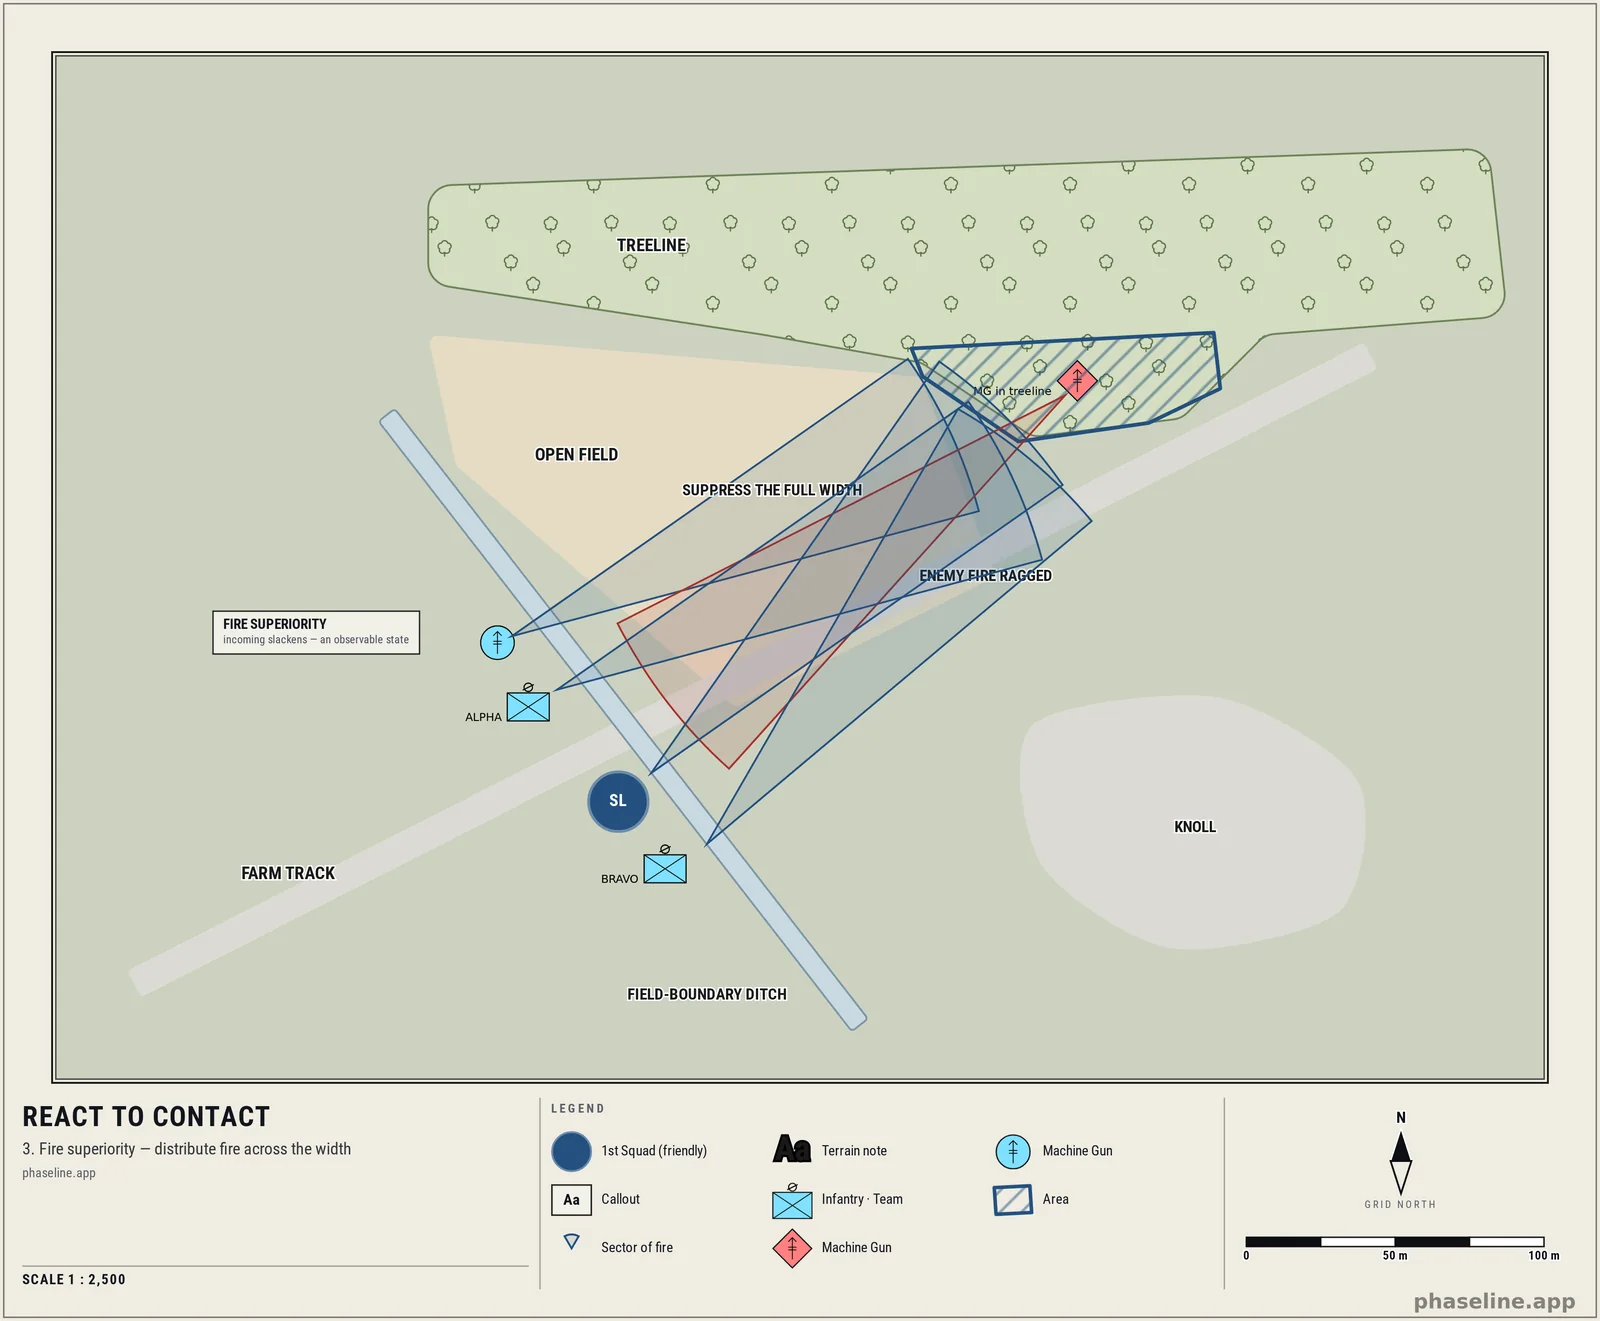
Alpha team, with its automatic rifleman, becomes the base of fire — a US Army squad carries one in each of its two fire teams, so Bravo keeps its own. Fire is distributed across the width of the treeline rather than concentrated on the one muzzle flash somebody saw — the enemy position has an extent, and suppressing the whole of it beats precise fire on a third of it. Team leaders control that with a fire command:
"GUN — FRONT — TREELINE AT THE BEND — TWO HUNDRED — SUPPRESS."
Fire superiority is an observable state, not a feeling. The test is whether enemy fire has slackened enough that it no longer effectively interferes with your ability to move. If your people can lift their heads and the incoming has gone ragged, you have it. If it has not, you do not have it, and a maneuver element that steps off anyway will be shot in the open. Most failed squad attacks fail here, one frame early.
4. The decision
This is the only frame in the drill where anyone thinks.
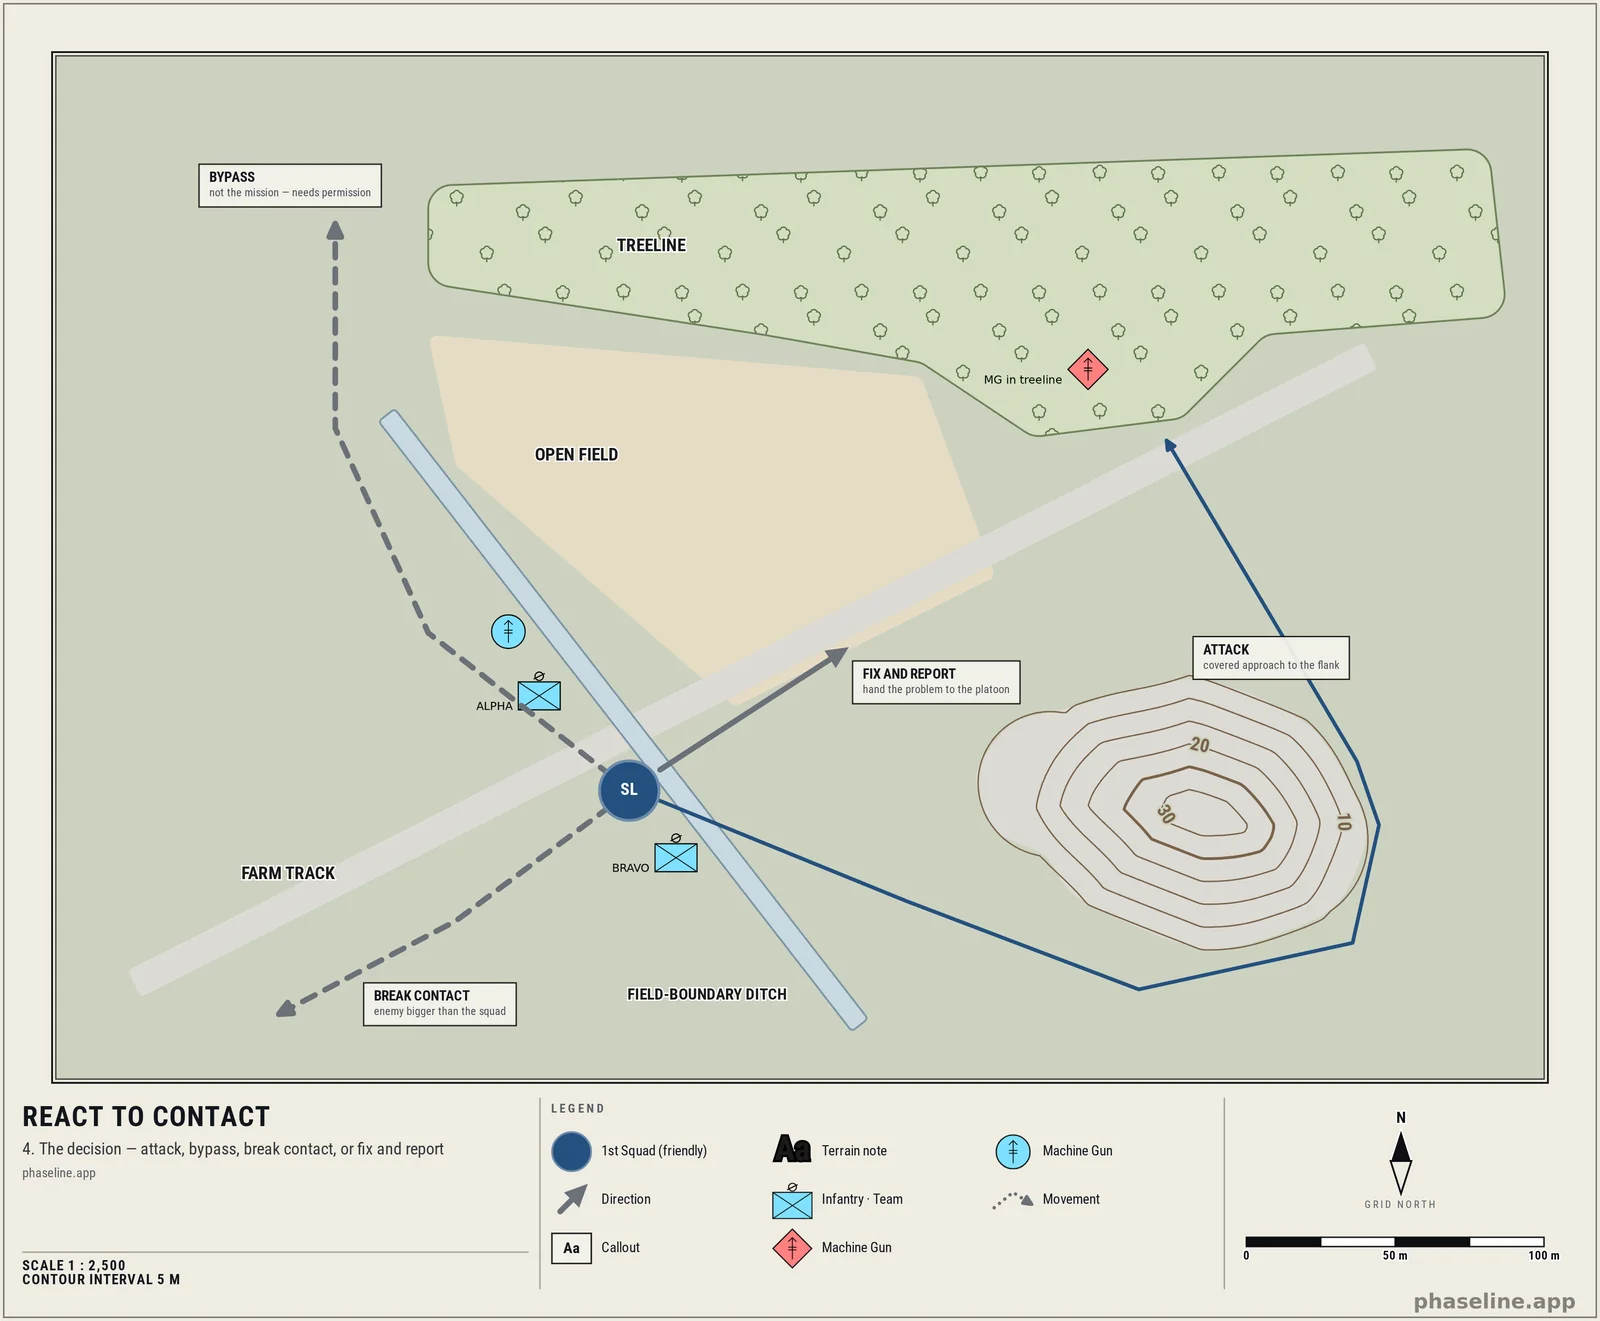
The squad leader, having gained fire superiority and had thirty seconds to look, now owns a decision the drill deliberately does not make for them. Four branches:
- Attack. The enemy is a size the squad can beat, there is a covered approach to a flank, and taking the position serves the mission. Transition into a squad attack.
- Bypass. The position is not the mission and it can be fixed or avoided, with higher's permission. Bypassing an unreported enemy is how the element behind you gets ambushed.
- Break contact. The enemy is bigger than the squad, or the ground gives them everything. Disengage deliberately.
- Fix and report. Hold the enemy in place with fire and hand the problem to the platoon, which has more to spend on it.
What the decision needs: enemy strength and whether they are dug in, whether a covered approach exists, your own casualties and ammunition, and the mission. What it must not wait for is certainty. A leader who holds the squad behind the ditch until the picture is complete has chosen "fix and report" without saying so, and has given the enemy the time to fix them.
Everything before this frame is reflex. Everything after it is a different drill, chosen here.
5. Maneuver
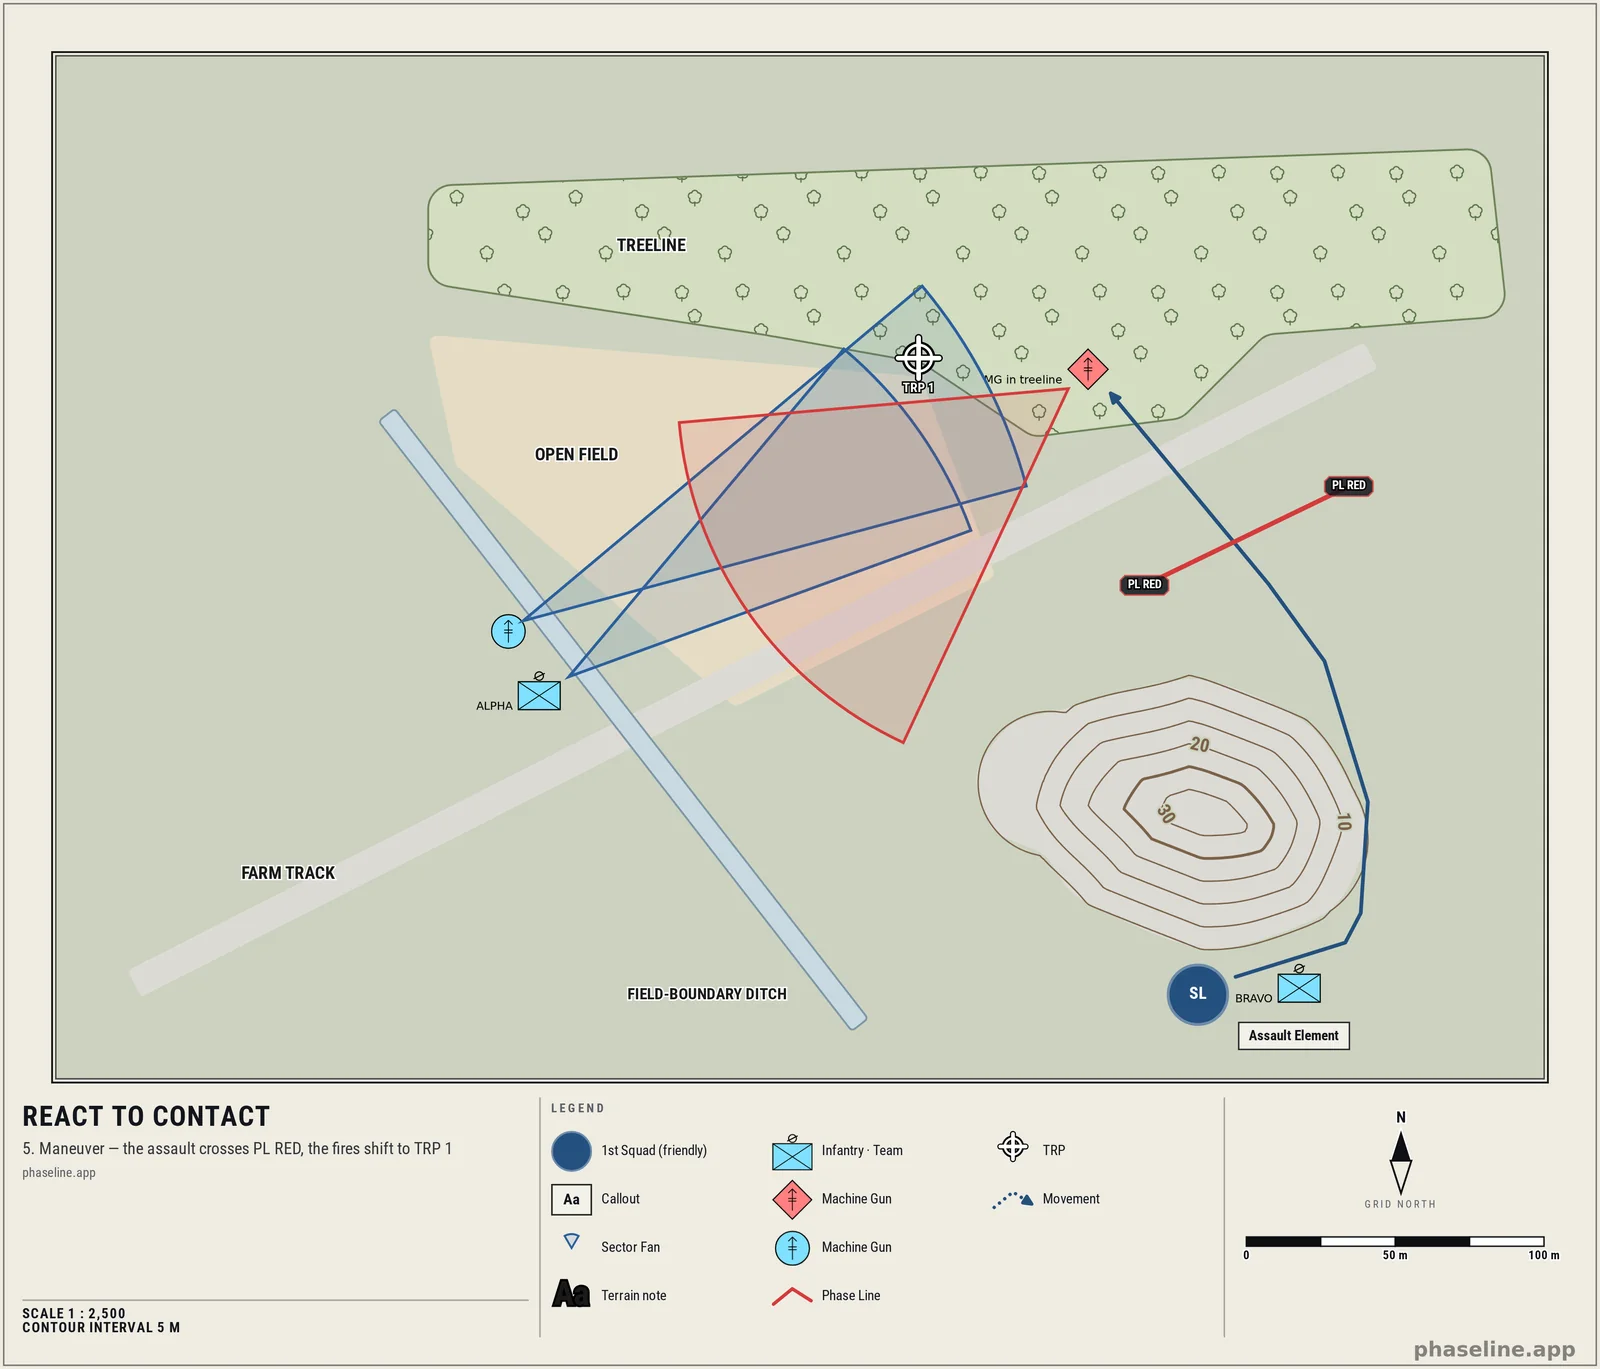
The squad leader chooses to attack. Alpha stays on the ditch line as the base of fire; Bravo maneuvers right, the squad leader moving with it, using the dead ground south of the knoll to come in on the position from the south-east.
The whole maneuver hangs on one thing: the trigger that shifts the fire. Bravo will walk into Alpha's beaten zone unless there is a mark on the ground that means shift now — briefed before anyone moves, and readable without a radio conversation. So draw it. A phase line across the assault lane, a target reference point on the side of the objective away from the assault, or both:
PL RED — when the assault element crosses it, the base of fire shifts left, off the eastern half of the position onto TRP 1 at its western end, and does not come back right. It lifts altogether when the assault reaches TRP 1.
That is a control measure doing its actual job: coordinating two elements that cannot hear each other over a machine gun. Two rules of geometry make it work, and both are visible on the map. Shift away from the assault, never across its front — a base of fire that shifts toward the flank its own assault element is coming from has just ranged its own squad. And keep the angle at the objective between the base of fire and the assault inside ninety degrees — put the two elements on opposite sides of the position and they are firing at each other across it, whatever the trigger says. Alpha keeps the enemy's heads down for exactly as long as that geometry allows, then shifts on a mark rather than on a guess, and lifts.
6. Consolidate and reorganise
The position is taken. This is where squads get killed by the counter-attack they did not expect, because the drill felt finished.
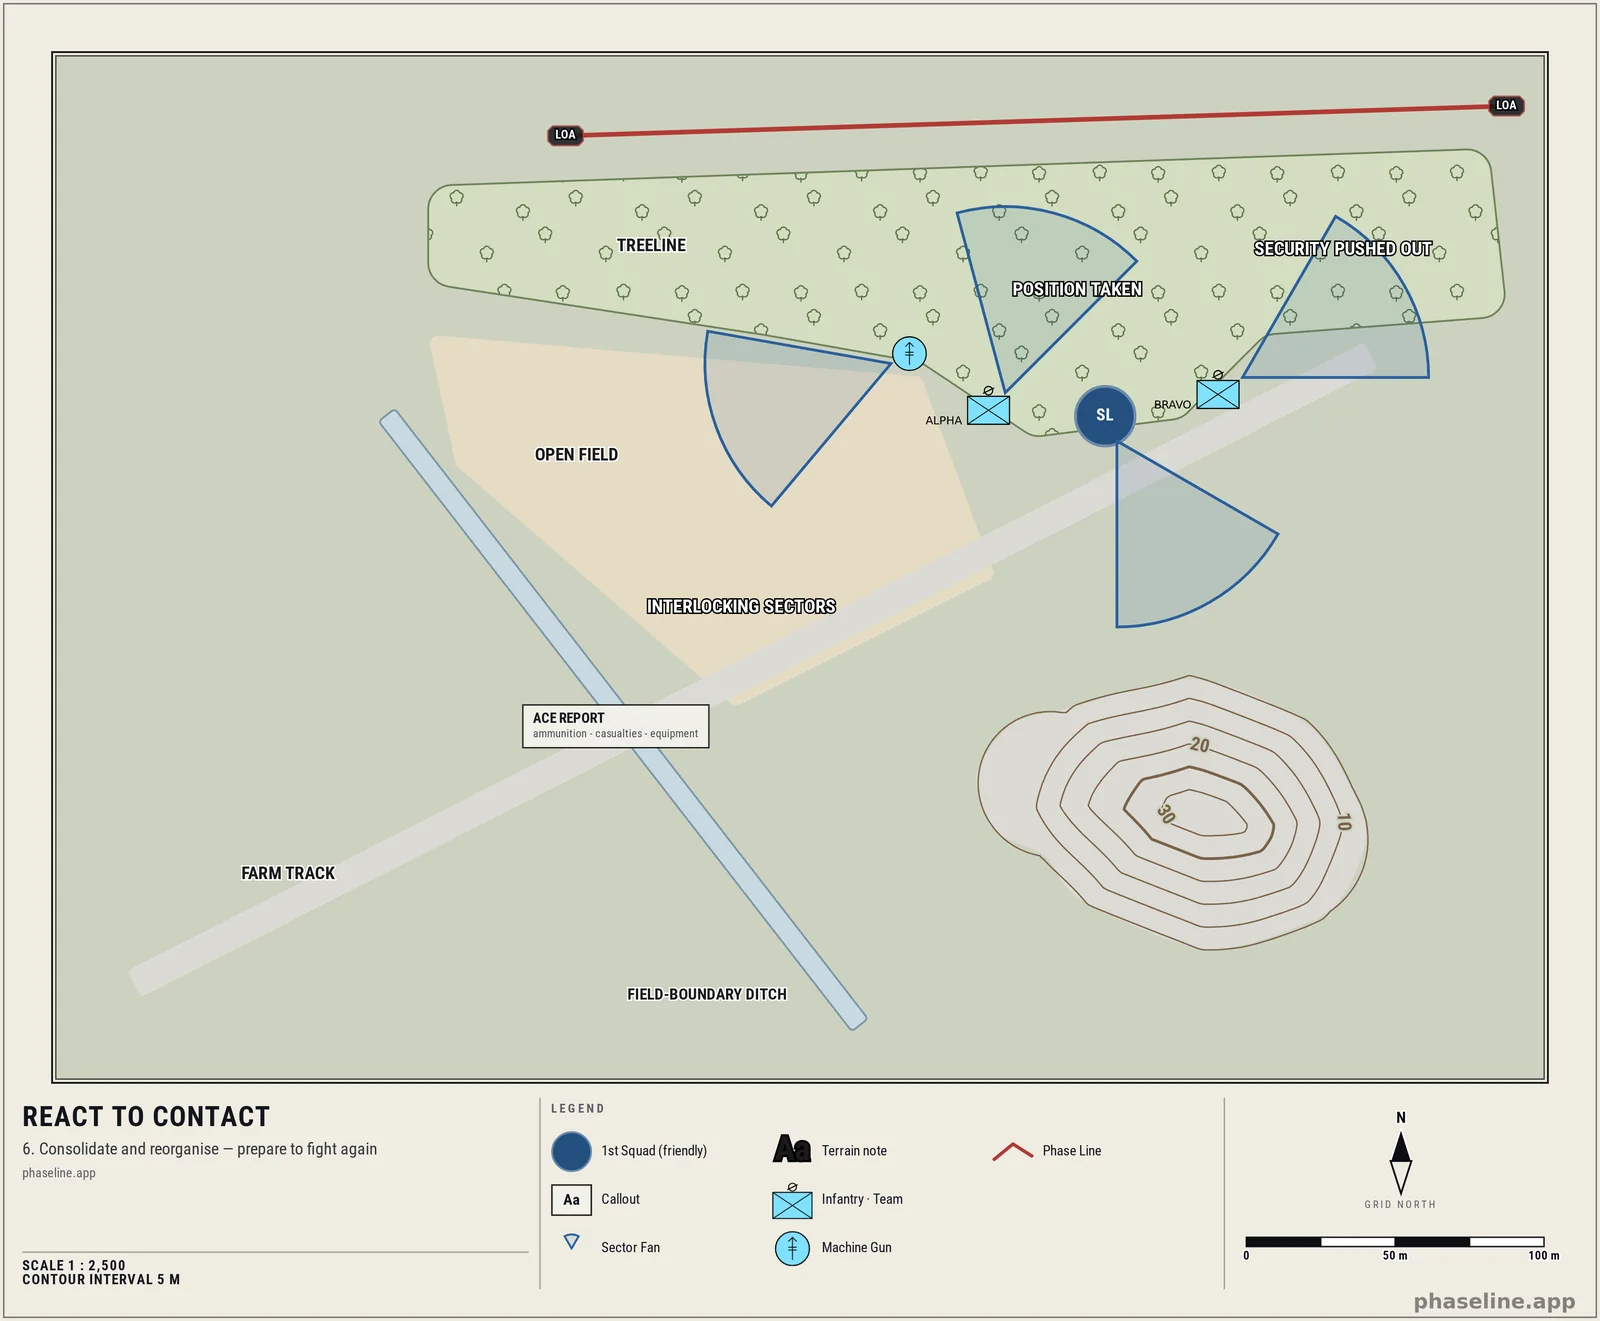
Consolidate — prepare to fight again, immediately. Occupy positions oriented on the likely enemy approach, assign sectors of fire that interlock, push security out beyond the objective, and set a limit of advance so nobody chases a runner into the next problem.
Reorganise — restore the squad's ability to fight. The ACE report comes up from the teams: ammunition, casualties, equipment. Redistribute ammunition and crew-served loads, treat casualties and move them to a casualty collection point, search the position for intelligence, and send the situation report to higher.
Only then is the drill complete. Any part of frames 1 to 5 may have to run again in ninety seconds.
Where the drill breaks
Three failures account for most of it, and each one is visible on the diagram.
Maneuvering before fire superiority. The most expensive mistake in the sequence. Frame 5 executed on frame 3's ground gets an assault element cut down crossing open ground. If the incoming has not slackened, the answer is more fire, not more movement.
Never leaving frame 1. The squad returns fire from behind the ditch, and keeps returning fire from behind the ditch, and slowly loses the firefight to an enemy who is dug in and has ammunition to hand. Returning fire is the beginning of the drill, not the drill.
No shift-fire trigger, or one that points the wrong way. Frame 5 attempted without frame 5's control measures. Everyone knew there would be a flanking attack, and nobody agreed on the mark that ends the supporting fire — or the mark existed and the fires shifted toward the flank the assault was coming from. Both are fratricide, and both are drawing problems: thirty seconds with a map before the patrol steps off would have caught either.
The point of all of it
Six frames, and only one of them contains a decision. That ratio is the design. Frames 1 to 3 are drilled so hard they need no orders, which is what creates the pause in which frame 4 becomes possible. Frames 5 and 6 are drilled again, so the leader's attention stays on the enemy rather than on the mechanics.
A squad that has to think in frame 1 will have nothing left for frame 4 — the only frame where thinking would have changed the outcome.
Draw it yourself
Every frame in this post is a scene in Phaseline — a free, browser-based top-down editor for exactly this: laying out ground, walking a drill frame by frame, and exporting clean briefing graphics.
- Step through the drill using phases, so each frame is a saved state of the same scene rather than six separate drawings.
- Draw the trigger — the phase line, the TRP, the limit of advance — so the shift-fire mark is on the map before the rehearsal instead of being argued about after it.
- Export and share the sequence straight into your briefing or your group's Discord.
Open the scenes from this post, drop them on your own ground, and rehearse the drill with your squad. Related reading: Control measures, explained in pictures for every mark used here, the handbook entry Phase lines for drawing a trigger line like PL RED yourself, and Sectors of fire and the arithmetic of suppression for what frame 3 is actually doing.